
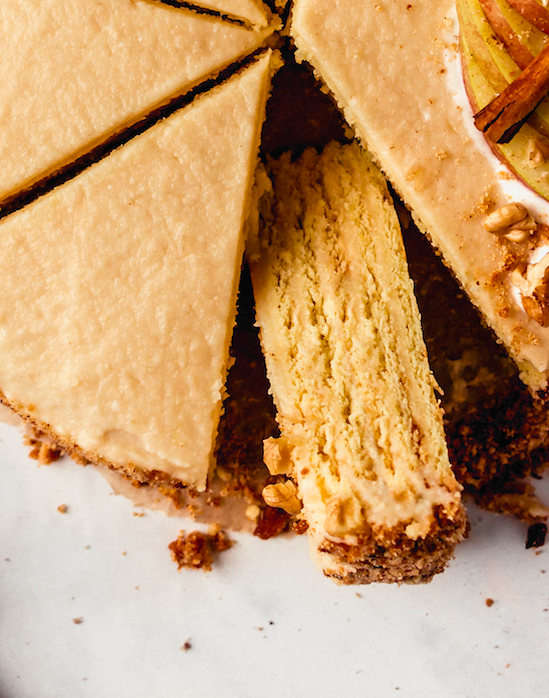
This Russian Apple Cake features 5 melt-in-your-mouth buttery layers with a deliciously sweet and slightly tangy apple and sour cream frosting. The end result is a dreamy fork-tender cake similar to mille feuille or Napoleon cake!
This is a great make-ahead cake that you can make over the course of 1-3 days making it ideal for the busy Holiday season!

Russian Apple Cake with Sour Cream
I love Russian cakes, especially the thousand-layer kind with lots of buttery layers that melt in your mouth which is exactly what you get with this one!
In particular, this is a Russian Apple Cake with a deliciously sweet and slightly tangy apple and sour cream frosting. Sour cream-based frosting is very popular for this kind of cake in Russia! I hope you’ll try this cake because it’s just so good!
Why this cake will surprise you:
- Mille feuille-like texture. With 5 buttery layers and lots of frosting, this cake has a melt-in-your-mouth texture that is very similar to mille feuille or Napoleon Cake!
- Apple sour cream frosting. Creamy and sweet with a slight tang, this frosting is made with cooked apples, spices, sour cream, and butter. Very different from American frostings but so delicious!
- Easy to decorate. This cake doesn’t require any decorating skills like most Russian cakes!
- Unique! If you love apple desserts but you’re looking for something different, this cake is what you need to surprise your loved ones!
- Make-ahead. This is the perfect cake to make ahead or even over the course of 2-3 days making it a great dessert for the busy Holiday season!
Ingredients for Russian Apple Cake
Apples. I like using a sweeter variety for this recipe like Honeycrisp or Jonagold. You don’t have to worry about the texture holding up because you will be blending them into a puree for the frosting so really focus on the flavor and sweetness when picking them out.
Lemon juice, to keep the apples from browning.
Water, to help the apples cook.
Sugar, regular white granulated sugar is perfect here. In both Russia and Europe it’s very common to also add in a small packet of vanilla sugar (about 1 tablespoon or 13 g) to add extra sweetness and flavor so if you have that, you can add it in, if not, it’s okay.
Cinnamon, for flavor.
Vanilla extract, for flavor.
Sour cream. You can use regular sour cream or get “smetana” which is basically the Russian version of sour cream, you can find it in any Russian or Eastern European grocery store.
Butter, unsalted. You will need enough for the frosting and cake layers.
Flour, all-purpose, for the cake layers.
Baking powder, for the cake layers.
Egg, for structure.
How to make Layered Russian Apple Cake
As usual, the full recipe + instructions will be in the recipe card down below but this is what to expect :).
STEP ONE: Cook the apples. Add the apples, lemon juice, water, sugar, and cinnamon to a skillet over medium-low heat. Cover with a lid and cook for 15-20 minutes or until the apples have softened.
Check every 3-5 minutes and stir, making sure the apples aren’t sticking to the pan. When the apples are done, turn off the heat and transfer to a baking sheet to cool down to room temperature.

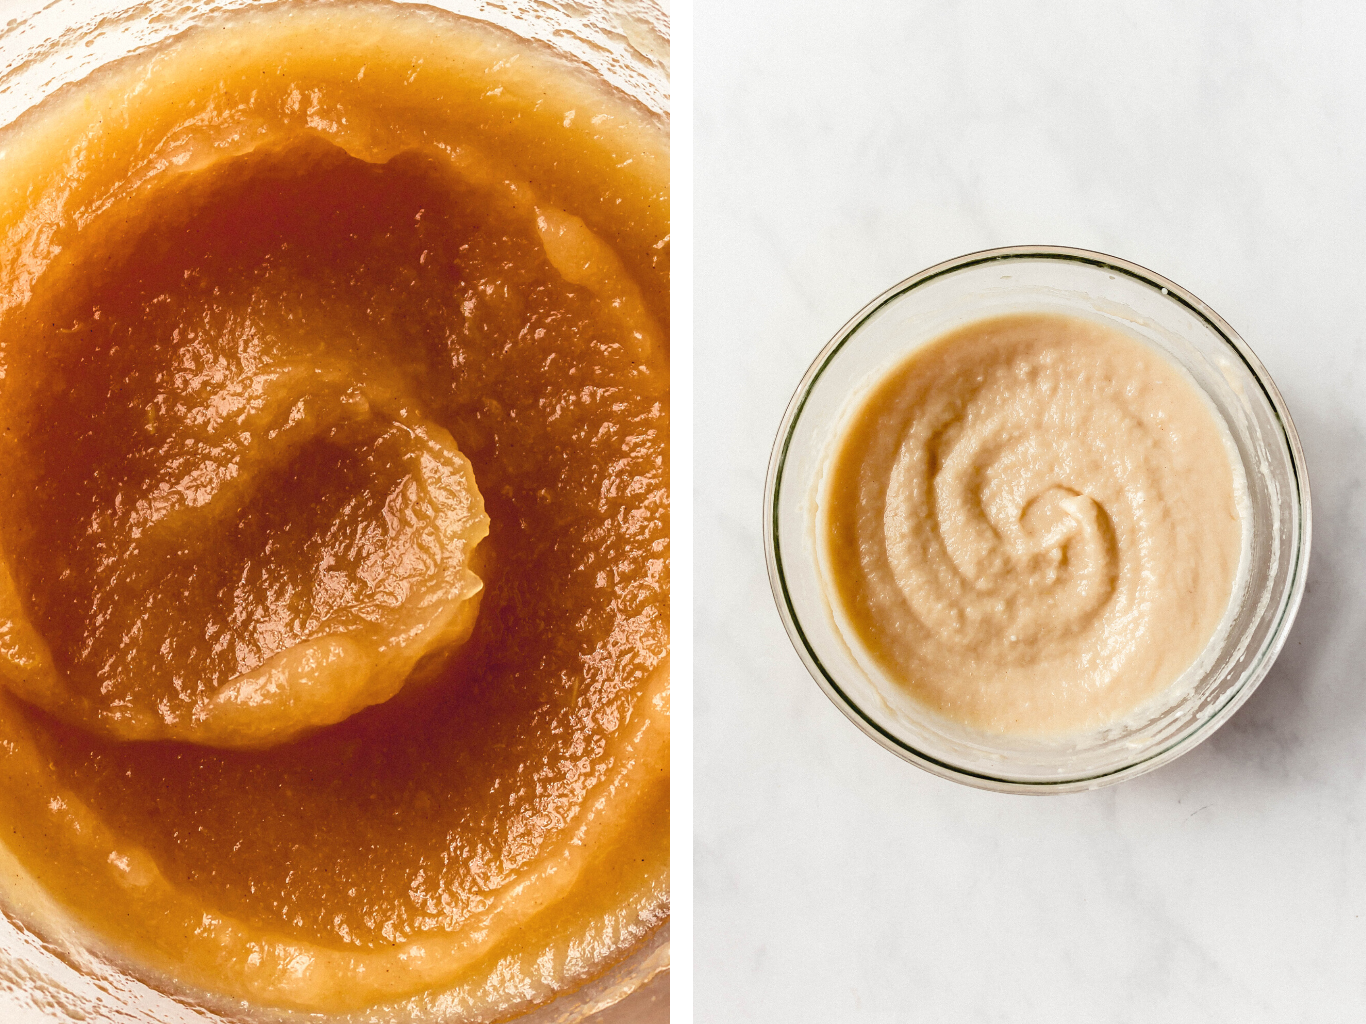
STEP TWO: Make the apple frosting. Once the apples have cooled down, use a food processor or blender to puree the apples until smooth. Transfer the apple puree to a medium bowl and add in the sour cream, butter, and vanilla extract and mix until combined and smooth. Cover with plastic wrap and place in the refrigerator to chill.
STEP THREE: Combine the dry ingredients with the butter. Add the flour, baking powder, butter, and sugar to a food processor and pulse until you get a crumbly texture with pea-sized bits of butter, just like when you’re making pie dough.
STEP FOUR: Cream the egg and sugar. In a separate bowl, cream the egg and sugar until smooth and paler in color then transfer the egg mixture into the flour mixture and mix or knead until a dough starts forming.
The more you can keep the butter from melting the better so try to work quickly without warming up the dough too much. Form the dough into a ball, wrap in plastic wrap, and chill in the refrigerator for 30 minutes or up until 1-2 days.
STEP FIVE: Preheat the oven to 375F (190C) and line a baking sheet with parchment paper.
STEP SIX: Make the cake layers. Remove the dough from the refrigerator, divide into 5 equal pieces and use a rolling pin to roll out each piece into an 8-inch (20 cm) disc. Lightly flour your work surface and rolling pin if the dough is sticking. The dough will come out pretty thin, it’s okay. Don’t worry about getting the edges to look even as you will trim the off later and pulse them into fine crumbs.

STEP SEVEN: Bake. Poke each with a fork multiple times to keep it from puffing up in the oven. Bake the layers in batches. Place 1 or 2 layers in your prepared baking sheet and bake for 6-7 minutes or until lightly golden. The edges will brown, it’s okay. Repeat until you bake all the layers.
STEP EIGHT: Trim the cake layers. Using a knife and a clean 7-inch (17-18 cm) bowl or plate as a guide, trim each cake layer into a 7-inch disc. Save the trimmings as you will need them in the next step.
You’re doing this now and not before baking because you want the scraps to be baked too, if you were to trim the cake layers when still raw, you would have to bake the trimmings separately at a lower temperature.

STEP NINE: Process the trimmings. Add the trimmings to a food processor or blender and pulse into crumbs. You will use these to decorate the sides of the cake. This is a very popular quick and easy way to decorate cakes in Russia 🙂 .
STEP TEN: Assemble the cake. Place the first layer onto your favorite cake stand or serving plate, then spoon 2-3 tablespoon of prepared apple frosting onto the center of the cake layer and use an off-set spatula to spread the frosting into an even layer.
Top with another cake layer and repeat the same process until you run out of cake layers. End with a frosting layer. Use any leftover frosting to smooth out the top and the sides of the the cake, then press the reserved crumbs onto the sides of the cake.
I added some extra sour cream, sliced apples, chopped walnuts, and cinnamon sticks on top but it’s totally optional.
STEP ELEVEN: Chill the cake. Cover the cake and chill in the refrigerator for 3-4 hours or overnight before slicing and serving. Store covered in the refrigerator for up to 3-4 days.

Make-Ahead And Storing Instructions
Make-Ahead Instructions: This is a great make-ahead cake! You can cook the apples (step 1) or cook the apples and make the apple frosting (step 1 and step 2) on day 1. On day 2, you can make the cake (step 3 through step 10), and then serve after 3-4 hours of chilling or serve on day 3 after chilling overnight (recommended).
Storing Instructions: Store the cake covered in the refrigerator for up to 3-4 days.
HAPPY COOKING LOVES!! I hope you'll love my Russian Apple Cake with Sour Cream as much as I do!
PS: Please leave a comment and/or give this recipe a rating ⭐️⭐️⭐️⭐️⭐️ if you make it! I LOVE hearing from you! 💘
More Russian desserts you’ll enjoy:
- Chocolate Salami (Shokoladnaya Kolbasa)
- Chocolate Cake Truffles (Shokoladnaya Kartoshka)
- Oladi with Apples (Russian Pancakes)

Russian Apple Cake with Sour Cream
Ingredients
For the Apple Frosting
- 18 oz (510 g) apples (peeled, cored and diced, about 3-4 large apples)
- 2 tbsp (30 ml) freshly squeezed lemon juice
- 2 tbsp (30 ml) water
- 1/2 cup (100 g) white granulated sugar
- 1/2 teaspoon ground cinnamon
- 3/4 cups (180 g) sour cream (room temperature)
- 1/2 stick (55 g) unsalted butter (softened)
For the Cake Layers
- 2 cups (250 g) all-purpose flour (sifted)
- 1 and 1/2 tsp baking powder
- 1 stick + 2 tbsp (140 g) unsalted butter (cold, diced)
- 1 egg
- 1/2 cup (100 g) white granulated sugar
Instructions
- Cook the apples. Add the apples, lemon juice, water, sugar, and cinnamon to a skillet over medium-low heat. Cover with a lid and cook for 15-20 minutes or until the apples have softened. Check every 3-5 minutes and stir, making sure the apples aren't sticking to the pan. When the apples are done, turn off the heat and transfer to a baking sheet to cool down to room temperature.
- Make the apple frosting. Once the apples have cooled down, use a food processor or blender to puree the apples until smooth. Transfer the apple puree to a medium bowl and add in the sour cream, butter, and vanilla extract and mix until combined and smooth. Cover with plastic wrap and place in the refrigerator to chill.
- Combine the dry ingredients with the butter. Add the flour, baking powder, butter, and sugar to a food processor and pulse until you get a crumbly texture with pea-sized bits of butter, just like when you're making pie dough.
- Cream the egg and sugar. In a separate bowl, cream the egg and sugar until smooth and paler in color then transfer the egg mixture into the flour mixture and mix or knead until a dough starts forming. The more you can keep the butter from melting the better so try to work quickly without warming up the dough too much. Form the dough into a ball, wrap in plastic wrap, and chill in the refrigerator for 30 minutes or up until 1-2 days.
- Preheat the oven to 375F (190C) and line a baking sheet with parchment paper.
- Make the cake layers. Remove the dough from the refrigerator, divide into 5 equal pieces and use a rolling pin to roll out each piece into an 8-inch (20 cm) disc. Lightly flour your work surface and rolling pin if the dough is sticking. The dough will come out pretty thin, it's okay. Don't worry about getting the edges to look even as you will trim the off later and pulse them into fine crumbs.
- Bake. Poke each with a fork multiple times to keep it from puffing up in the oven. Bake the layers in batches. Place 1 or 2 layers in your prepared baking sheet and bake for 6-7 minutes or until lightly golden. The edges will brown, it's okay. Repeat until you bake all the layers.
- Trim the cake layers. Using a knife and a clean 7-inch (17-18 cm) bowl or plate as a guide, trim each cake layer into a 7-inch disc. Save the trimmings as you will need them in the next step. You're doing this now and not before baking because you want the scraps to be baked too, if you were to trim the cake layers when still raw, you would have to bake the trimmings separately at a lower temperature.
- Process the trimmings. Add the trimmings to a food processor or blender and pulse into crumbs. You will use these to decorate the sides of the cake. This is a very popular quick and easy way to decorate cakes in Russia.
- Assemble the cake. Place the first layer onto your favorite cake stand or serving plate, then spoon 2-3 tablespoon of prepared apple frosting onto the center of the cake layer and use an off-set spatula to spread the frosting into an even layer. Top with another cake layer and repeat the same process until you run out of cake layers. End with a frosting layer. Use any leftover frosting to smooth out the top and the sides of the the cake, then press the reserved crumbs onto the sides of the cake. I added some extra sour cream, sliced apples, chopped walnuts, and cinnamon sticks on top but it's totally optional.
- Chill the cake. Cover the cake and chill in the refrigerator for 3-4 hours or overnight before slicing and serving. Store covered in the refrigerator for up to 3-4 days.

Jane says
A bit of a labor of love but so worth it!!