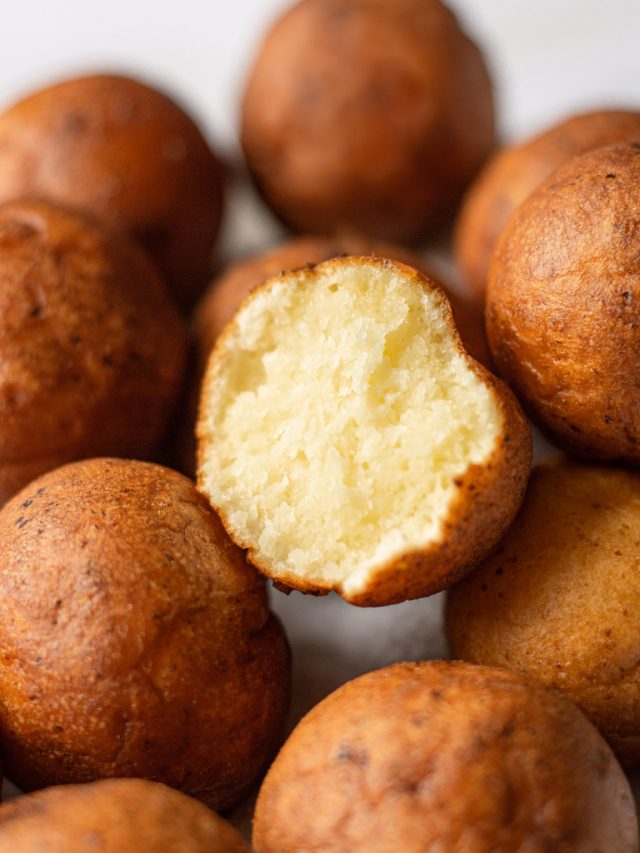
Pan De Coco (or Coconut Bread) is pillowy-soft and slightly sweet, with a rich coconut flavor and deliciously crispy caramelized tops with lots of toasted coconut flakes!
These coconut buns will make you feel like you’re biting into a coconut-flavored cloud on some heavenly tropical island.

Pan De Coco
There are times where I just can’t convey to you guys how soft a specific bread turns out. This is the case with this Pan De Coco or coconut bread, coconut buns, whatever you want to call this baby.
If you love coconut and pillowy-soft, heaven-like sweet breads, you need to try this one. It’s so soft that it feels like biting into a pillow but the tops are deliciously crispy and caramelized with toasted coconut flakes.
It’s delicious paired with a cup of Chocolate Con Queso (hot cocoa with cheese hehe) but you can also pair with savory dishes as it’s mildly sweet!

What Is Pan De Coco
Pan De Coco means “Coconut Bread” in Spanish and it’s a type of sweet bread (“pan dulce” in Spanish) made in many Caribbean countries which is why you may come across different versions of coconut bread.
It’s incredibly soft, mildly sweet, and has deliciously crispy caramelized tops with toasted coconut flakes. It obviously has a rich coconut flavor so I highly recommend trying it if you love coconut and sweet breads in general.

Pan De Coco Ingredients
Flour. Use all-purpose flour for this recipe. Ideally, I recommend you use a scale for this recipe because you want to get the amount of flour right. Using more flour than necessary will give you a tough bread!
Instant yeast. If you’re new to working with yeast, don’t worry, this is just another ingredient that you’ll add to the bowl, nothing fancy. If you do have questions regarding baking with yeast, here’s my Beginner's Guide to Baking with Yeast!
Sugar. I use white granulated sugar for this recipe.
Coconut milk. Use canned coconut milk. My favorite is Goya (you can get it here on Amazon) but any good brand will work. You want it to be warm, so warm it up on your stove so it can activate your yeast (90 F – 110 F max).
Eggs. You’ll need one for the dough and one for brushing the buns.
Coconut oil. If you live in a warm place, your oil will already be liquid so you can just add it in (perks of living at the Equator lol). If you live somewhere cold, your coconut oil will be hard so you need to melt it, then allow it to come down to lukewarm/room temperature and then measure it once it’s liquid.
Coconut extract. This is what will give you a rich coconut flavor so don’t skip it. Depending on the brand and type of extract you get, you might need more or less product. If you get a bottle, I recommend you go in with a full tbsp. If you get a tiny little vial then half the vial or a few drops (depending on the intensity) are enough. When sold in tiny vials, extracts are usually much stronger and you need less.
Salt. This is a sweet bread but you always want a tiny pinch of salt when baking!
Brown sugar. For that deliciously crispy caramelized top!
Coconut flakes. I get whatever brand I find at my grocery store so feel free to choose your favorite. You can also use shredded coconut if that’s what you have on hand. I like flakes because they’re bigger and they give you more flavor + more texture.
How to make Pan De Coco
Make the dough. In a large bowl or the bowl of a stand-mixer fitted with a dough hook, add the flour, yeast, sugar, coconut milk, and egg. Mix until a dough starts forming. Keep mixing until the dough starts pulling away from the sides of the bowl, then mix or knead by hand on a lightly floured surface until the dough is mostly smooth.
It’s okay to add up to 2 tablespoon of extra flour if you find that your flour absorbs the liquid differently.
Add in the melted coconut oil and knead until the dough is smooth and elastic but not sticky. When the oil starts absorbing, you might find that the dough gets a bit messy – it’s okay, keep going and it will come together!
Let rise. Place the dough in a greased bowl (do not grease the bowl with coconut oil if you live in a cold place or it will harden, use regular vegetable oil) and cover with plastic wrap or a clean kitchen towel. Allow to rise in a warm environment until doubled in size.
Make the buns. Divide the dough into 14-16 balls, then shape by tucking under to create a perfectly smooth top. Place the buns onto two baking sheets lined with parchment paper and cover with plastic wrap or a clean kitchen towel.
Let rise again. This time the rise won’t take as long, let the buns rise until puffy.
Decorate. Brush each bun with beaten egg, then sprinkle with brown sugar, and coconut flakes.
Bake until golden on top. A toothpick inserted in the center of the buns should come out clean. Serve immediately along a glass of hot chocolate or ice-cold coconut milk.

Can I make Pan De Coco ahead of time?
You can follow the recipe until step 2, then place the covered bowl in the refrigerator and allow the dough to rise overnight. The next morning, take the bowl out of the refrigerator and allow it to come to room temperature before following the recipe (step 3).
I don’t recommend baking the bread ahead of time because, just like many other baked goods, Pan De Coco is best when eaten as soon as it comes out from the oven!
How do I store Pan De Coco?
You can store your Pan De Coco in an air-tight container at room temperature for up to 2 days. Or you can freeze it in a ziplock bag for up to 6 months.
I don’t particularly recommend storing large amounts of Pan De Coco because I think that baked goods are best eaten fresh as they tend to dry up over-time, even when frozen. You can cut the recipe in half if you want less buns.

More Latin American Recipes you'll love:
- Rosca De Reyes Recipe (Latin American Three Kings Cake)
- Pan De Yuca (Ecuadorian Cheese Cassava Bread)
- Torta Negra Colombiana (Colombian Black Cake)
- Rompope (Latin American Eggnog)

Pan De Coco
Ingredients
For The Dough
- 4 cups (500 g) all-purpose flour
- 2 and 1/4 tsp (7 g) instant yeast
- 1/2 cup (100 g) white granulated sugar
- 1 cup (240 ml) canned coconut milk (warm, 90 F – 110 F max)
- 1 egg (room temperature)
- 1 tablespoon coconut extract (or half a vial or a few drops if it comes in a small vial)
- 1/4 teaspoon salt
- 1/4 cup (60 ml) melted coconut oil (room temperature)
For Topping
- 1 egg (beaten, for brushing)
- 1/3 cup (65 g) brown sugar
- 1/3 cup (70 g) coconut flakes or shredded coconut
Instructions
- Make the dough. In a large bowl or the bowl of a stand-mixer fitted with a dough hook, add the flour, yeast, sugar, warm coconut milk, egg, coconut extract, and salt. Mix until a dough starts forming. Keep mixing until the dough starts pulling away from the sides of the bowl, then mix, or knead by hand on a lightly floured surface, until the dough is mostly smooth (2-4 minutes). It's okay to add up to 2 tablespoon of extra flour if you find that your flour absorbs the liquid differently. Add in the melted coconut oil and knead until the dough is smooth and elastic but not sticky (8-10 minutes). When the oil starts absorbing, you might find that the dough gets a bit messy – it's okay, it will come together!
- Let rise. Place the dough in a greased bowl (do not grease the bowl with coconut oil if you live in a cold place or the oil will go back to solid, use regular vegetable oil). Cover the bowl with plastic wrap or a clean kitchen towel. Allow to rise in a warm environment until doubled in size. Meanwhile, line two baking sheets with parchment paper.
- Make the buns. Divide the dough into 14-16 balls, then shape each ball by tucking under to create a perfectly smooth top. Place the buns onto your prepared baking sheets and cover with plastic wrap or a clean kitchen towel.
- Let rise again, until the buns are puffy (30-40 minutes). Meanwhile, preheat the oven to 350 F (180 C).
- Decorate. Brush each bun with the beaten egg, then generously sprinkle with brown sugar and coconut flakes.
- Bake for 10-12 minutes or until golden on top. A toothpick inserted in the center of the buns should come out clean. Serve immediately.
Notes
📷 DID YOU MAKE THIS RECIPE?! Tag @itsdamnspicy on Instagram and hashtag it #itsdamnspicy


Leave a Reply